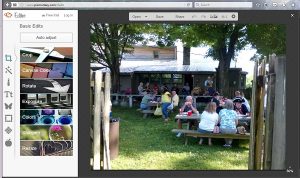
There are many photo editing programs and apps available, but I personally like and use the free program on PicMonkey. If you prefer to use a different photo editing program or app, that’s fine. Just be sure it allows you to easily:
- adjust the exposure, colors, remove red eye, etc. to enhance the photo quality, as needed;
- crop the photo to scale and remove distractions, better center the subjects, etc. as explained herein;
- reduce the dimensions of the photo and the file size;
- add a copyright notice as text at the bottom of the photo; and
- rename the file according to our naming conventions when saving the formatting changes made to the photo.
Start by opening PicMonkey or your preferred photo editing program in a new tab. This is a screenshot of the PicMonkey homepage, although there is a slider that may change the graphics of what you see on that page.
Notice that you do not have to sign up or log in. This is a free program. You do not need the free trial, either. All you have to do is upload your photo to the PicMonkey site by clicking on the “Edit” icon at the top of the page. When you click on the icon, PicMonkey allows you to select the source file from several locations:
- your PC’s hard drive
- OneDrive
- Dropbox
My example photo is on my computer’s hard drive, so I click on the “Computer” icon and a dialogue box opens for me to scroll through the folders and select the file I want to edit. If your photo is on Dropbox, click that icon, instead.
I clicked on “IMG_20150515_171438” and then clicked “Open.”
Within seconds PicMonkey launches the Editor and displays my photo in the work area.
This is where all the magic happens!
The left sidebar has tabs for the different tasks that we need. We are not going to be using all of them. Just the basic ones to accomplish our goal of prepping a photo from your cell phone so it can be add to your web site. If you want to add more features or do more editing than suggested, feel free to experiment with the other tabs and icons another time. You can always come back and do more to the photo. The only caveat is that you can always make the photo smaller, but you cannot usually make the photo larger. So, be sure to save the original photos in an archive file, just in case you need to come back to it for different editing and formatting options.
Also, anything you do on PicMonkey can be cancelled or undone by clicking on the applicable icons. Your changes are not incorporated into the file until you deliberately save the file.
First thing we need to do is use the “Auto Adjust” feature. Then we will crop it, resize it, add text and rename the file. The next page shows you how, step by step.
Go to the next page, PicMonkey Basics.


